If you want to bounce all the tracks in a project, then Logic Pro X would be the best DAW to convert them into audio files or stems. If you are on the verge of completing the production stage and thinking of carrying out a technical mix, then Logic Pro X can be of proper use.
Logic Pro X helps you to make the details in smaller sections and also helps you to show your creative side. If you want to load the sound in a separate DAW format or plan to send the steam to somebody else, then it might also be an important reason to use Logic Pro X.
Lastly, if your system is not quite powerful, then bouncing to audio will reduce the load on your CPU. So, to bounce stems in Logic Pro X, you have to open the project along with the stem. From the top of the screen, select File menu > Bounce > Replace All Track. Next, save the project and adjust the bounce setting accordingly. Finally, click OK and wait for Logic Pro X to bounce all audio tracks to stems. All the previous versions will be replaced by the bounced version.
Let’s get to know how to bounce stems in Logic Pro through a more step-by-step process.
In This Article:
2 Methods to Bounce Stems in Logic Pro X
The methods are quite simple; at first, you need to have a quick look to understand the format of the resulting audio stem and then go through methods to gain control over the resulting format of the stem.
There are various methods, so let’s get to know each of them and apply them to get a general export of our song.
Method 1: Bounce and Replace All Tracks
In this method, bouncing of all the tracks to an audio file will take place within the project. This will remove the original track and replace it with audio tracks that have bounced stems.
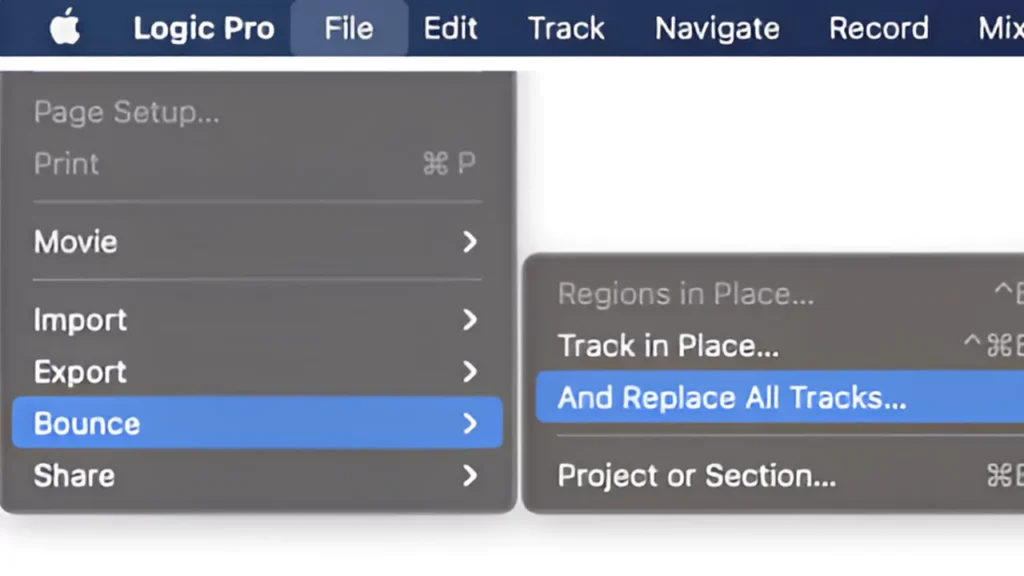
To begin, you have to get to the menu bar, select File, and then click on Bounce and highlight Replace All Tracks.
In case you have forgotten to save the project, then you will be provided with a window giving an option: “Before bouncing and replacing all the tracks, it is recommended to save the project. Do you wish to do this?” Click on Save and then proceed to Next.
You will get another window where you have to make changes to the bounce settings.
- Bypass effect plugin settings – In this option, you have to tick the box, and soon the process of bouncing the track will begin. But remember, the track will not apply any plug-in inserts that you have on the channel strip. The plugin will be present on the new audio track, replacing the original track. However, here, you get the option to remove them if you want.
- Include volume/pan automation settings – You have to apply it along with the current volume/ pan automation on the resulting audio file. This will apply to all the bounce stems if you are looking forward to the current volume balance.
- Select Normalise to adjust the collective gain of all the audio files – This will keep the loudest peak of the audio files at 0 decibels and will also be quite supportive if your audio has any glitches. If that is not the case, then you can turn it off or select the “Over Protection only” option.
It is also recommended to save the project when the bounce is complete, as it will delete all the original audio tracks. So, if you select Save As, then you can access the original project whenever needed.
Finally, to initiate the bounce and replace process, you have to press OK and wait for the process to complete. When the bounce is done, you will find that all the tracks are getting replaced, or you get to the project folder’s audio files or subfolder to locate the audio file.
The result might not appear to be clean always, as audio files tend to get mixed with other audio files. But, if you want to eliminate this problem and have more control over the audio output files, then we have another method for you.
Method 2: Export All Tracks as an Audio File
If you do not want the original tracks to get replaced with the bounce stem, then this method will serve you best. Rather than deleting the files, this method exports the track as audio files to a specific location, based on your preference, on the computer.
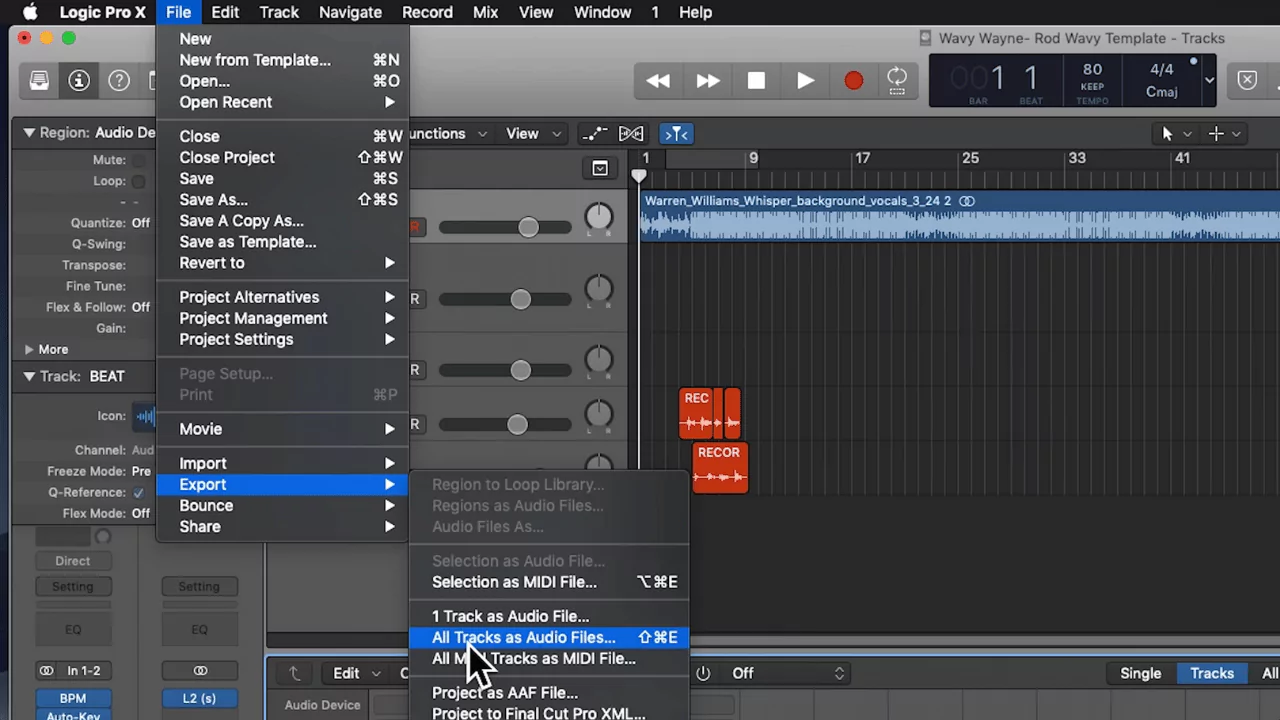
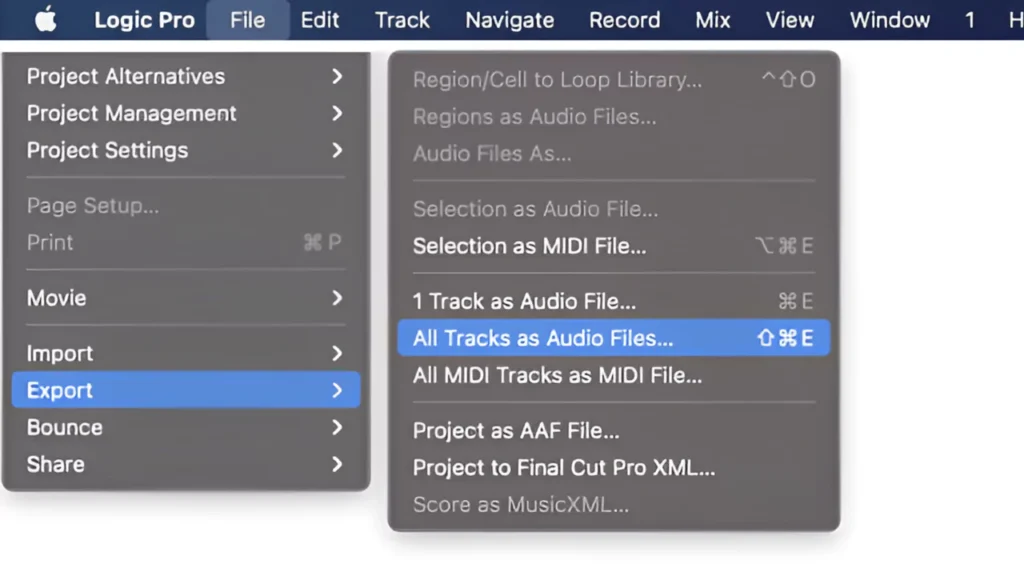
So, to start with the process, you have to get to the menu bar and select File > Export > All tracks as audio files. Next, a new window will appear, but before you proceed, it is always recommended to create a new destination folder where you can save all the audio files.
You can create a folder by clicking on the New Folder label, present at the bottom of the window. Now, the location of the folder should be easy to navigate so that you can find it while dealing with any project.
Now, let’s make the changes.
- Select range – So that you can include the exact part of the project where the audio files will be included.
- Save format – Choose the format of the audio file, whether it will be AIFF or WAV.
- Bit Depth – This setting allows you to control the bit depth of the stems, and the most common is 24 bits.
- Multi-Output software instruments – Here, you get to select how many stems you can export for instruments with multi-output. The instrument list includes Ultrabeat, Drum Kit Designer, and more. You can export a separate stem for every single output.
- Add resulting files to the project browser – In the Project Browser section, you can add a reference for the respective audio files for the Project.
- Naming system- Here, you get to decide how each of the files will be named. Drag a combination in the pattern box and add text through the Custom box. Here, you get to place the Custom element.
Right after this, you get to locate the destination folder and see if it is being populated with audio files. Now, compress the files into a .ZIP file and send the stem to anybody. This will make the stem manageable and also compact.
How to create a bus group?
Logic Pro X will help you to create audio files, but it will not include bus groups in the main window. To include the bus group, you have to click on the Group bus channel strip, select Create Track, and wait for the process to complete. A track will be created that includes all the stems. You can also get a reference about the bus group and how it can serve you to mix and send stems.
What is the difference between WAV and track stem?
In the case of raw WAV files, the tracks are all recorded in multi track recording. On the contrary, stems are counted as discrete groups of instruments that are bounced to a single stereo file.
What should you choose: Dry Stem or Wet Stem?
Choosing Dry Stem or Wet Stem depends on the type of work you are indulged in. If you are a songwriter or a mix engineer, then you must go for a dry stem. This will help you to play and add effects to the stem at the same time. On the other hand, if you want effects such as reverb, EQ, and more, then you must go for wet stems.