If you want to remove vocals from a song in GarageBand, then you have to mute the vocal track in the mix. You can also try to use the elements in a single track to isolate vocal frequency by using EQ.
Do remember you can only isolate the vocals in GarageBand if the vocal track is on a separate track when compared with the rest of the vocals.
Usually, people remove vocals or mix audio tracks so that they can edit them easily, and the entire process takes just 1 minute to complete. So, let’s get to the details on how you can isolate vocals on GarageBand.
In This Article:
How to remove a track in GarageBand on a Mac device?
You have to use your Mac device and launch the GarageBand, then go to the project featuring the vocal track. This should be the same track that you want to remove or isolate. Now, highlight the Mute option to remove the vocal. This keeps the track as it is and does not delete it from the project. Rather, the Mute option removes the vocals from the song.
Other way round, you can also select the vocal and then press the Delete key from your keyboard. This would remove the entire audio.
Alternatively, you can press the Solo option right under the name of the track, if you want to isolate the vocals. Using this feature will also help you to play the vocals only.
Remove vocals through the EQ
If you are confused about how to remove vocals which are not isolated, then you can use the EQ control. While going through this step, you might face a little difficulty because you have to lower the respective EQ frequency to remove the vocals.
So, if you are ready to use the EQ of the entire song, then here is how you can do it:
- You have to get the song in the GarageBand for which you want to remove the vocals.
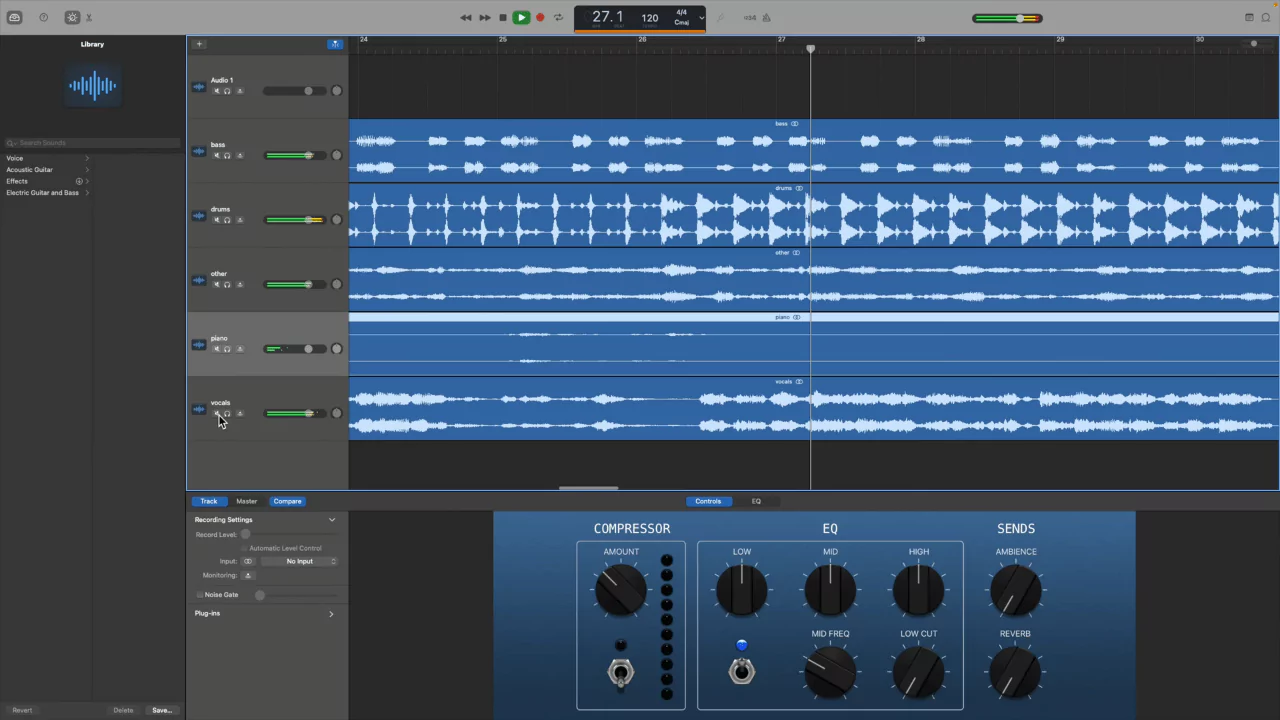
- Next, highlight the entire song track and to access the EQ settings, you have to choose Smart Controls.
- Then, in the Smart Controls window, click the Track heading and further from the Smart Controls window, click EQ.
- You will find a graphic EQ band on the screen that you have to address, and this will help you to adjust to specific frequencies within the soundtrack.
- Usually, this frequency ranges from 86 Hz to 350 Hz, based on the EQ chart.
- So, to remove the vocals, you have to adjust the EQ within this frequency.
- After several trials, you will find the exact EQ that will help to remove the vocals and then reduce the vocals through the graphic EQ band.
Thus, technically, you are not removing the vocals, and rather, you are reducing the volume.
If you make a mistake in this process, don’t worry because GarageBand provides you with an Undo button to help you get a perfect output.
How to remove vocals from songs in GarageBand on iPhone/iPad?
You can also launch GarageBand on your iPhone or iPad to isolate vocal tracks. It might have been quite easier to remove the vocals on Mac in GarageBand, but on iPhone and iPad, the steps are completely different.
Here are the steps that you need to follow:
- Launch GarageBand on iPhone/iPad and open the project, which is featuring the vocals that you want to isolate.
- Now, tap on the Mute icon within the vocal track, and you will easily find it with a Speaker symbol with a slash through it.
- This will help to keep track of the project, but you won’t be able to hear when you are trying to playback or export. Also, if you click on Delete, this will remove the track.
- Alternatively, if you want to isolate the track, then click on the headphone icon, which is right beside the Mute button. Wait for the process to complete, and the track will be isolated.
Remove vocals by adjusting the EQ from an Unisolated track
You can remove the vocals while adjusting the EQ. So, here are the steps that you need to follow:
- First, select all the tracks that you want to EQ and then click on the Control icon and select plugins and EQ heading.
- To get more settings, you will see a sidebar. Here, you have to bring up the Graphic EQ display by clicking on Visual EQ.
- Next, you will find the Graphic EQ Display, which pops up, and you have to adjust the EQ.
- To make the changes, you can proceed by controlling the dots and moving them up or down in order to alter the frequency.
- When you have completed the work and are satisfied with the result, tap on the option Done.
Things To Remember
- The easiest way to remove the vocals from songs in GarageBand is to mute the vocals or delete them.
- If you want to remove vocals from a song, then in GarageBand, you have to use the graphic EQ feature.
- In case you do not want any isolated vocal track, then you can try to alter the vocal frequency. Also, while you are trying to adjust the EQ, it would be quite different for Mac and iPhone/iPad.
- If you want to remove the vocals by adjusting EQ, then it would affect the entire mix of the song along with the vocals. If there are any other audio elements of the same frequency present in the track, then they will also be removed as well.
How can you improve the audio quality using GarageBand?
When you are using GarageBand, you will find a feature that can optimise the sound of any track and project, and now, this is termed the EQ/ equalizer effect. By using this EQ effect and applying it accurately on the master track. You get to shape the sound on the overall project and on individual tracks.
What is the use of a Compressor in a Garageband?
GarageBand comes with a feature called Compressor, which is used to adjust the volume of any patch of vocals. This is used to smoothen the abrupt level changes in the vocals. Compressor can also help to add punch and a definition to a track. This feature will also make the sound better, along with a narrow dynamic range.
How many tracks can you add to GarageBand?
The maximum number of tracks you can add to GarageBand is 256 and so you have to choose the template for 256 tracks. The more audio tracks you choose, the more flexible you get while adding different types of instruments and voice insertion in the song.
How can you separate audio in GarageBand?
To separate audio in GarageBand, you have to split an audio region. To start with- select the audio region which you want to split and place the Playhead exactly where you want to split the audio. Next, select Edit > Split Region at Playhead (This will help to split the region of the audio). Finally, as an output, you will get two separate audio regions.
Is it possible to clean up the audio in GarageBand?
If you want to remove the hissing sound in any audio, which is also known as cleaning up the audio. By using this feature, you get to set a threshold volume based on your audio track. Now, any sound that is below this threshold level gets eliminated, and thus, you get a clean-up sound that stays above this threshold level.